
Black-eyed peas are one of those foods that just feel like comfort. They are warm, filling, and taste like something your family would make on a cozy night. The best part? You can cook them in the Instant Pot (Instant Pot Black Eyed Peas) without soaking them first. That means no waiting overnight — just toss them in, press a button, and get tender beans in under an hour.
I love using my Instant Pot for this recipe because it’s so easy and reliable. The beans always come out soft but not mushy, and I don’t have to watch the stove. When I first started cooking beans, I always forgot to soak them ahead of time. This method saved me — and now I make black-eyed peas all year, not just for New Year’s Day.
In this guide, I’ll show you exactly how to make Instant Pot Black-Eyed Peas step by step. You’ll learn which ingredients to use, how long to cook them, different flavor ideas, and tips to store leftovers. By the end, you’ll know how to make this classic dish in a way that fits your taste.
What Are Black Eyed Peas and Why Cook Them in an Instant Pot?
Black-eyed peas are not really peas — they are a type of bean. They have a small black spot that looks like an eye, which is how they got their name. These beans are very healthy because they have lots of protein, fiber, and vitamins like folate. People in the South often eat them on New Year’s Day for good luck, but they are a great food to enjoy all year long.
Cooking black-eyed peas on the stove can take a long time, and you usually have to soak them first. The Instant Pot makes this so much easier. It cooks the beans fast and you don’t have to soak them at all. I like that I can put everything in the pot, press start, and do other things while they cook. When the timer goes off, the beans are soft and ready to eat.
The Instant Pot also makes the beans taste better because it traps all the flavors inside while cooking. If you add garlic, spices, or a ham bone, the flavor goes right into the beans. You also don’t have to worry about undercooking or overcooking them because the cooking time is always the same.
Ingredients You’ll Need
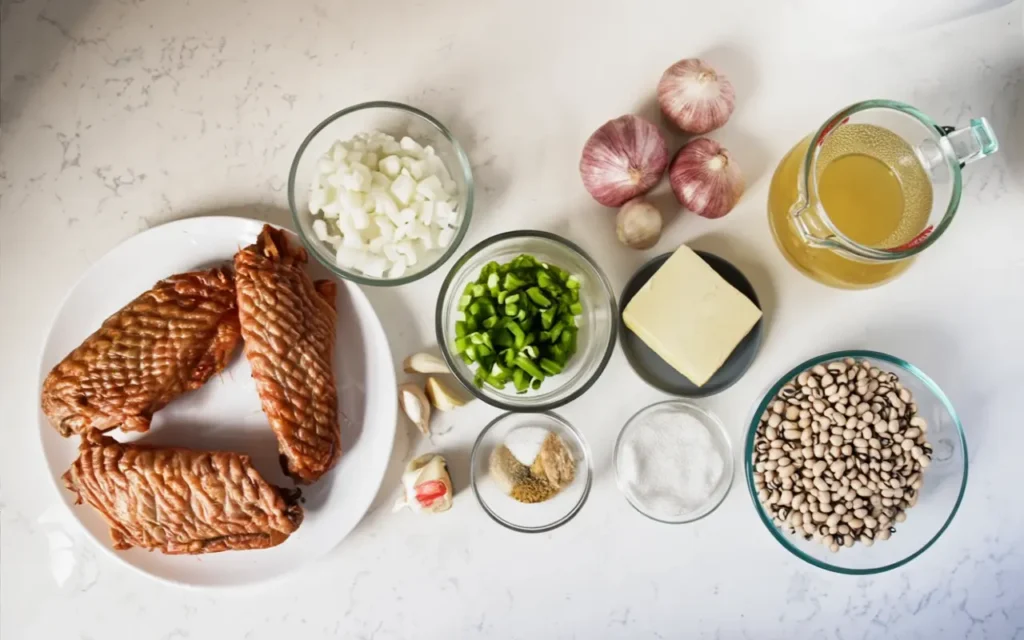
Core Ingredients
- Dried Black-Eyed Peas – The star of the recipe. No soaking needed.
- Water or Broth – Use vegetable broth or chicken broth for extra flavor.
- Salt – Add a little while cooking to bring out the taste.
Optional Flavor Boosters
- Garlic & Onion – Add a rich, savory base.
- Bay Leaf – Gives a warm, earthy flavor.
- Smoked Paprika – Adds a smoky taste, perfect for vegan recipes.
- Ham Hock, Smoked Turkey, or Bacon – For classic Southern flavor.
- Collard Greens, Kale, or Spinach – Stir in after cooking for color and nutrients.
- Tomatoes or Vinegar – Brightens and balances the flavors at the end.
Vegan & Vegetarian Swaps
- Use vegetable broth instead of chicken broth.
- Skip the meat and add liquid smoke or extra smoked paprika for a smoky taste.
- Stir in fresh greens or veggies for extra nutrition and color.
How to Cook Black Eyed Peas in the Instant Pot (Step-by-Step)
1. Rinse and Prep
Start by placing the dried black-eyed peas in a colander and rinsing them under cold water. This helps remove any dust or dirt from the beans. Take a quick look through the peas and pick out any small stones or damaged beans — it doesn’t happen often, but it’s worth checking. I always do this step because it keeps the final dish clean and safe to eat.
2. Add Ingredients
Pour the rinsed beans into the Instant Pot, then add water or broth. If you’re using garlic, onion, bay leaf, or smoked paprika, add them now so the flavor cooks into the beans. Wait to add salt, tomatoes, or vinegar until after cooking — they can make the beans cook unevenly. I learned this the hard way when my beans turned out a little too firm the first time I tried.
3. Set the Instant Pot
Lock the lid and set the valve to “Sealing.”
- Unsoaked beans: Cook on High Pressure for 15–17 minutes.
- Soaked beans: Cook on High Pressure for 8–10 minutes.
- Frozen beans: Treat them like soaked beans and cook for 10 minutes.
Once the timer is done, let the pressure naturally release for 10–15 minutes before switching to quick release. Natural release helps the beans stay tender and hold their shape.
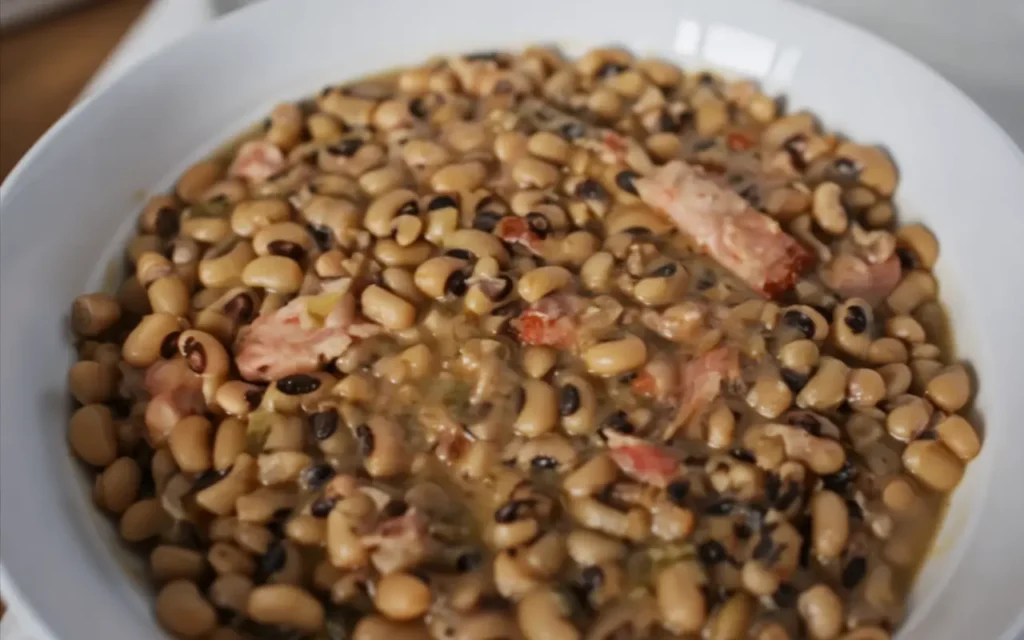
4. Finish and Season
After opening the lid, stir the beans and taste them. Add salt, pepper, and any other spices you like. This is also the perfect time to stir in chopped collard greens, kale, or spinach so they stay bright and fresh. For extra flavor, I often add a splash of apple cider vinegar — it makes the beans taste fresh and balanced.
Cooking Times: Soaked vs. Unsoaked Black Eyed Peas
Cooking times can make or break your dish. Black-eyed peas cook fast compared to other beans, but knowing the right time helps you avoid mushy or undercooked peas. I like using a simple chart to keep things consistent, whether I soak the beans or toss them in straight from the bag.
| Type of Black-Eyed Peas | Instant Pot Cook Time | Pressure Release | Notes |
| Dried (No Soak) | 15–17 minutes | Natural Release (10 min) | Great for quick dinners. Yields creamy, tender beans. |
| Soaked Overnight | 6–8 minutes | Natural or Quick Release | Keeps beans firmer and saves cooking time. |
| Frozen (Cooked) | 3–4 minutes | Quick Release | Just reheat and season. Perfect for meal prep nights. |
If you like beans on the firmer side, lower the cook time by a minute or two. For extra-soft beans (ideal for soups or purees), add 1–2 extra minutes of pressure cooking. I’ve found that soaking beans overnight gives a slightly sweeter flavor and makes them easier to digest — a great tip if you cook for kids or anyone with a sensitive stomach.
Flavor Variations
Black-eyed peas are like a blank canvas — you can season them to fit almost any mood or meal. Here are my favorite ways to switch things up, depending on whether I want comfort food, a plant-based dish, or a bold curry night.
- Southern-Style Black Eyed Peas
For classic comfort, I add a smoked ham hock or a bit of bacon to the Instant Pot along with collard greens and a splash of hot sauce. This gives the beans a smoky, savory flavor that reminds me of Sunday dinners in the South. If you like heat, a few dashes of cayenne or chili flakes will take it to the next level. - Vegetarian / Vegan Version
When I want a lighter, plant-based version, I swap meat for vegetable broth and add smoked paprika to get that same deep flavor. Toss in chopped tomatoes and fresh greens like kale or collards for a healthy, nutrient-packed bowl. This vegan black-eyed peas recipe is cozy but still light enough for a weekday lunch. - Indian-Style Curry
For something bold and full of spice, I turn the beans into a curry. I sauté cumin, turmeric, and garam masala, then add coconut milk for a creamy texture. Serve it over rice or with warm naan bread — it’s one of my favorite ways to make beans exciting without much effort.
Serving Suggestions
Black-eyed peas are super versatile, which makes them easy to pair with almost any meal. One of my go-to ways to serve them is over rice — simple, filling, and budget-friendly. If you want a more traditional Southern vibe, pair them with fluffy cornbread on the side. The soft, smoky beans and slightly sweet cornbread are the perfect match.
Another classic is serving them on New Year’s Day. This tradition, called Hoppin’ John, is said to bring good luck and prosperity for the year ahead. I like to make a big pot, serve it with greens and rice, and share it with family — it feels like starting the year on a positive note.
You can also get creative and mix cooked black-eyed peas into soups, stews, or even salads. They add a hearty texture and extra protein, making any dish more satisfying. Sometimes, I toss them with fresh tomatoes, cucumbers, and herbs for a quick bean salad — perfect for busy weekdays.
Storage and Meal Prep Tips
- Fridge Storage:
- Store cooked black-eyed peas in an airtight container.
- Keeps fresh for 3–4 days.
- Save some cooking liquid to keep beans moist.
- Store cooked black-eyed peas in an airtight container.
- Freezing Tips:
- Freeze in portion-sized containers or freezer bags.
- Lay bags flat to save space and make thawing easier.
- Let beans cool completely before freezing to avoid mushy texture.
- Use within 2–3 months for best flavor.
- Freeze in portion-sized containers or freezer bags.
- Reheating Tips:
- Reheat gently on the stove over low heat or in the microwave.
- Add a splash of water or broth to keep beans creamy.
- Slow reheating preserves flavor and texture, making them taste fresh.
- Reheat gently on the stove over low heat or in the microwave.
Troubleshooting & Common Mistakes
- Beans Too Firm:
- Add 2–3 extra minutes of pressure cooking.
- Helps achieve soft, tender beans without overcooking.
- Add 2–3 extra minutes of pressure cooking.
- Beans Too Mushy:
- Reduce cooking time by a minute or two.
- Consider using quick release to stop cooking sooner.
- Reduce cooking time by a minute or two.
- Burn Notice:
- Usually caused by not enough liquid or ingredients sticking to the bottom.
- Adjust the liquid-to-bean ratio and stir before sealing.
- Usually caused by not enough liquid or ingredients sticking to the bottom.
- Instant Pot Won’t Seal:
- Check the sealing ring — it may be out of place or need cleaning.
- Properly seated sealing ring prevents pressure problems and cooking errors.
- Check the sealing ring — it may be out of place or need cleaning.
FAQs (Frequently Asked Questions)
Do you have to soak black-eyed peas before cooking?
No, you don’t have to soak them when using an Instant Pot. One of the best things about pressure cooking is that it cooks no soak beans quickly and evenly. I often skip soaking because it saves time, and the beans still turn out tender and flavorful.
How long do black-eyed peas take in the Instant Pot?
Cooking time depends on whether the beans are soaked or unsoaked. Unsoaked dried beans take about 15–17 minutes on high pressure, while soaked beans only need 6–8 minutes. If using frozen beans, treat them like soaked beans and cook for 3–4 minutes.
Can you cook them with meat?
Yes! Adding a ham hock, bacon, or smoked turkey infuses the beans with a rich, smoky flavor. I love cooking Southern-style black-eyed peas this way for extra depth. Just add the meat before sealing the Instant Pot so the flavors meld while cooking.
Can you make them spicy?
Absolutely! You can stir in hot sauce, chili flakes, or cayenne pepper after cooking. I like to adjust the spice level depending on my mood or who I’m cooking for. This way, you can have mild, medium, or fiery black-eyed peas without changing the cooking process.
How do I make them creamy?
For creamy beans, cook the black-eyed peas just until tender and let the pressure release naturally for 10–15 minutes. Adding a splash of broth and lightly mashing some of the beans at the end also gives a rich, creamy texture. I often do this when making bean soups or stews to give the dish a smooth, hearty feel.
Conclusion
Instant Pot black-eyed peas are easy and very flexible. You can make them Southern-style with smoky ham and greens, spicy with Indian spices, or simple and vegan. I like how the Instant Pot does most of the cooking, so weeknight dinners are quick and stress-free.
You can also play with flavors. Add smoked paprika, fresh greens, or a splash of vinegar to change the taste. I often mix it up depending on what’s in my pantry — sometimes smoky, sometimes spicy, and sometimes fresh and light.
If you haven’t tried this yet, make a batch this week. Serve it with rice, cornbread, or in a salad. Once you taste how soft and tasty these beans are, you’ll see why it’s becoming a family favorite and a top choice for quick, healthy dinners.