
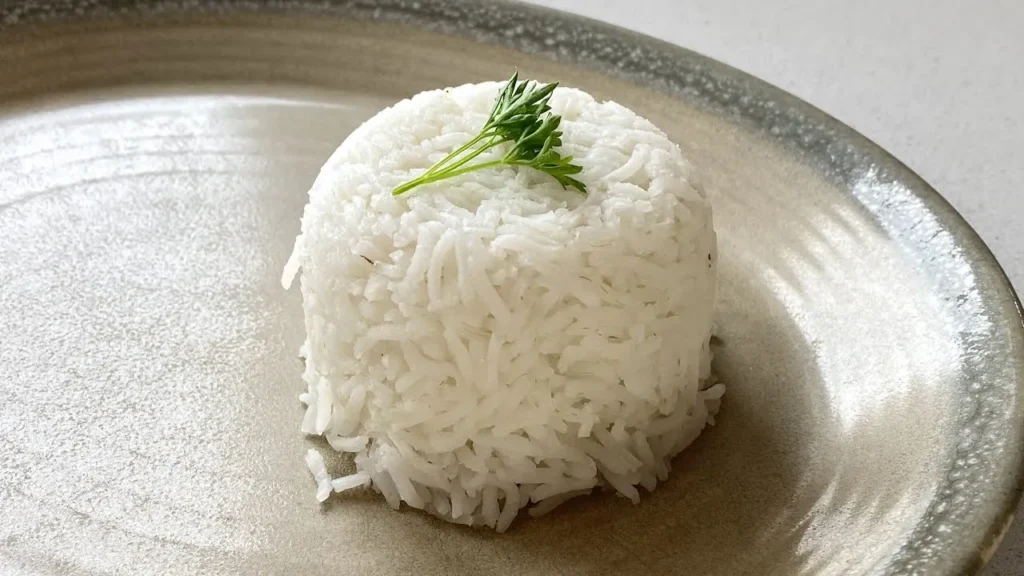
How to cook rice in a pot on the stove (my default), microwave or oven! My method to make steamed rice is very simple and easy to follow – no rinsing, no colanders, and none of the complicated steps used in other recipes. Your rice will turn out fluffy and soft every time – never sticky or mushy. And yes, I really care about good rice!
Use this recipe for:. Check separate directions for: jasmine Rice
How to cook rice
Everyone should know how to cook rice perfectly – even without a rice cooker! Today, I’m sharing how I cook rice in 3 simple ways:
- Stove in a pot (13 min) – best results, my regular method
- Oven (35 min) – easiest for big batches, very hands off
- Microwave (12 min) – fastest and most convenient
Which rice to use for this recipe
Use this rice recipe for:
- long grain white rice
- medium grain white rice
- short grain white rice except sushi rice (which is also short grain but needs a different method)
See separate recipes for:
- basmati rice
- jasmine rice
- brown rice
DO NOT use this recipe for:
- sushi rice – follow the directions given in its own recipe
- wild rice, black rice, or other special types of rice
- risotto rice – use a proper risotto recipe
- paella rice – follow a Paella recipe
- quinoa – use a separate quinoa recipe
Wondering about the difference between rice types?
The simple rule is: the shorter the rice grain, the stickier the rice. Sticky does not mean gummy! It just means the grains stick together a bit more instead of falling apart, which makes them easier to eat with chopsticks.
The longer the grain, the less sticky it is. Basmati is the least sticky type of rice (and Indian food is usually not eaten with chopsticks!), while short grain rice is the most sticky. For example, sushi rice is a type of short grain rice, and it needs to be sticky so sushi rolls can hold their shape. You cannot make sushi rolls with basmati rice!
Rice to water ratio
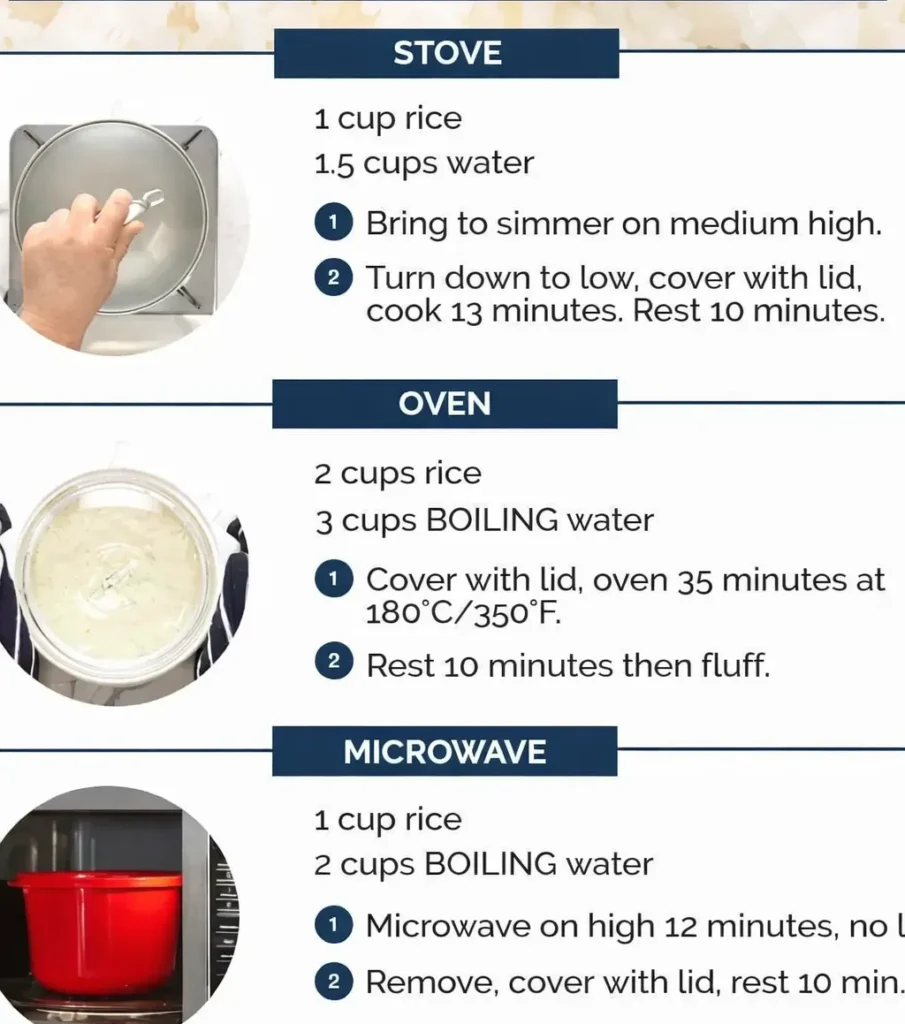
For 1 cup of rice, you need 1.5 cups of water when cooking rice on the stove or in the oven.
If you are cooking rice in the microwave, increase the water to 2 cups.
If you rinse the rice, reduce the water by 2 tablespoons for each cup of rice.
You don’t need to rinse rice to get fluffy rice if you use the correct cooking method and rice to water ratio! More details about rinsing or not rinsing are explained below.
How to cook rice on the stove (my default method)
- Add 1 cup of rice (no rinsing!) and 1.5 cups of water to a saucepan. Bring it to a boil over medium-high heat without a lid
- Lower the heat to low, cover with a lid, and cook for 13 minutes
- Turn off the heat, keep the lid on, and let it rest for 10 minutes
- Fluff the rice with a fork, rice paddle, or spatula and enjoy perfectly fluffy rice!
This is my go-to method for cooking rice, and out of the 3 methods I’m sharing, it gives the best results – very close to using a rice cooker. The rice cooks evenly, the grains are soft but not mushy, and the surface is not sticky or gummy.
You don’t need to rinse rice if you follow this cooking method!
How to cook rice in the oven
This method is great for hands-off cooking and making large batches of rice.
- Put rice and boiling water in a small casserole dish with a lid (or use a pan covered with foil)
- Cover and bake at 200°C/390°F (180°C fan) for 35 minutes
- Take it out of the oven and let it rest for 10 minutes
- Fluff with a fork and enjoy perfectly cooked fluffy oven-baked rice
Using boiling water helps the rice cook more evenly in the oven because it doesn’t need extra time to heat up (which can take more than 10 minutes).
This is my second favorite way to cook rice. It’s not as perfect as cooking rice on the stove because some rice around the edges can get slightly crispy. But it still tastes very good, and the small difference is worth it for such an easy, hands-off method.
Some people think rice should not be sticky at all, but that’s not true! Rice should be a little sticky—otherwise, billions of Asians would find it hard to eat rice with chopsticks!
How to cook rice in the microwave
A useful emergency method! I use this when I quickly need rice, especially for photos.
- Add 1 cup of rice and 2 cups of boiling water to a microwave-safe round container that is 3 to 4 times taller than the water level (because the water bubbles up a lot)
- Microwave uncovered on high for 12 minutes
- Take it out, cover it, and let it rest for 10 minutes
- Fluff and enjoy!
Most microwaves heat from the outside in, so using boiling water helps the rice cook more evenly.
A round container cooks more evenly than a square or rectangular one, but it’s not very important.
Cooking rice in the microwave is just as fast as cooking it on the stove, and it requires less effort. However, it’s not quite as perfect as stove-cooked rice. The rice may not cook as evenly, but the difference is very small—most people won’t even notice it!
You might not like the idea of microwave rice at first… but it’s actually very useful to know this method!
When I’m working and need rice for stir fries, curries, or other dishes I’m preparing, I often make rice in the microwave because it’s quick and convenient. Things can get really busy during shoot days!
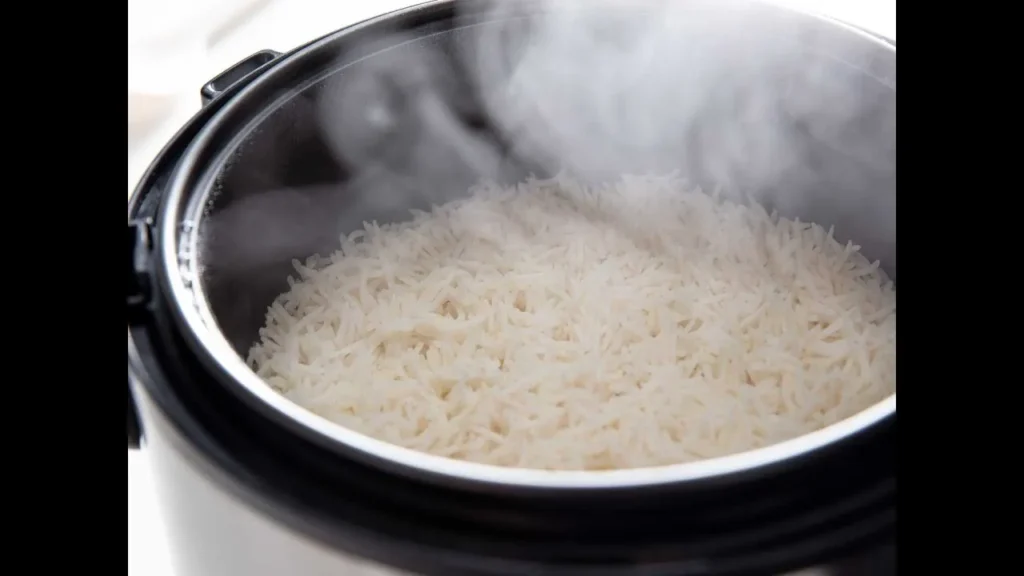
Here’s how the microwave rice looks. It’s hard to show the texture in photos, but the rice is fluffy and doesn’t have that sticky or gluey surface on the grains.
The biggest mistake people make when cooking rice
The most common mistake is using too much water. Many recipes say 2 cups of water for 1 cup of rice when cooking on the stove, which usually results in rice that is too soft and has a sticky, gummy surface.
This problem gets worse if you rinse the rice. Rinsing removes starch, but it also adds water weight. Have you ever weighed rice before and after rinsing? That extra weight is all water!
So recipes that use 2 cups of water and rinse the rice end up with almost 2¼ cups of water per 1 cup of rice, which makes the rice overly soft and gummy.
The perfect ratio for stove-cooked rice is 1:1.5 (rice to water). If you do rinse the rice, just reduce the water by 2 tablespoons per cup of rice.
There is no need to rinse rice to make it fluffy!
Many people believe rinsing rice is the secret to perfect rice, thinking it removes extra starch and makes the rice fluffier.
Yes, rinsing does remove some starch, but it’s not necessary. Your rice will still turn out beautifully fluffy if you follow my 1:1.5 rice-to-water ratio and cooking method for the stove (or the other methods above).
The only times you really need to rinse rice are:
- To clean it – if you bought rice from street markets or sources that aren’t pre-packaged, rinsing removes dirt or impurities.
- Flavoured rice recipes – some dishes, like Biryani, Curried Rice with Carrots, or Coconut Rice, call for rinsing because other ingredients make the cooking liquid thicker. Sometimes I even par-boil the rice first to keep it fluffy.
If you do rinse rice, remember to reduce the water by 2 tablespoons per cup of rice, because the rice absorbs some water during rinsing (weigh it before and after rinsing to see how much water it takes on).
How do you wash rice?
The easiest way is to use a bowl:
- Put the rice in a bowl and fill it with water.
- Swish the rice around with your hand, then pour the water off.
- Repeat this 3–4 times.
Note: The water will never become completely clear, and that’s okay.
Troubleshooting
- Scorched base – If the bottom of the pot burns when you fluff the rice:
Heat too high: Some stoves are stronger than others and may be too powerful for the saucepan you’re using. Switch to a smaller burner.
Pot too large: Don’t cook a small amount of rice in a big pot. This makes the water evaporate too quickly and can burn the rice.
- Water not absorbed – Don’t take the rice off the stove until all the water is fully absorbed. Tilt the saucepan to check. Cooking usually takes 13 minutes on an average stove, but weaker stoves might need 15–17 minutes. Also, don’t skip resting the rice for 10 minutes after cooking. This lets any leftover water get absorbed.
- Rice not properly cooked – Sometimes the grains cook unevenly, and some stay hard.
Did you peek while cooking? Lifting the lid lets steam escape, which stops the rice from cooking properly.
Did you rest the rice for 10 minutes? This is when the rice finishes cooking.
Did you use the right pot size? Don’t cook 1 cup of rice in a giant pot, or the water will evaporate too quickly.
Fix it! Add ¼ cup extra water for every cup of rice you cooked, cover, and cook on low for 5 more minutes. Then let it rest for 10 minutes.
- Rice too hard for your taste – This recipe makes rice al dente, the Asian way, like in your favourite Chinese, Thai, Japanese, or other Asian restaurants. It might feel a little firm if you are used to softer rice. Start with the base recipe, then add 2 tablespoons of water for your next batch. If it’s still too firm, add 1 more tablespoon of water for each following batch until it reaches the texture you like.
- Overflow mess on the stove or microwave – Use a saucepan 4–5 times taller than the water level and a heavy lid. For microwave rice, make sure the container is at least 4 times taller than the water. Oven-baked rice usually doesn’t overflow because it cooks more slowly.
- Cooking rice at high altitude – For stove cooking, add 1 extra minute for every 300m (1,000ft) above sea level. Water boils at a lower temperature at high altitudes, so rice takes longer to cook.
Tips
- NO PEEKING, NO STIRRING! – Don’t lift the lid or stir the rice while it’s cooking. This is the easiest way to ruin it! Lifting the lid lets steam escape, which can leave the rice undercooked or uneven. Stirring releases starch, making the rice gluey, which is the worst.
- Never skip resting for 10 minutes – This is when the rice finishes cooking with residual heat. The water on each grain is fully absorbed, giving you perfectly fluffy rice that isn’t sticky or gluey.
- Don’t bring it to a heavy boil – On the stove, avoid a rapid boil. If it’s too hot, covering it traps too much heat and can make it boil over. Bring it to a gentle simmer on medium-high heat, with soft bubbles and a little foam on the surface. If some liquid still boils over, add 1 extra tablespoon of water next time.
Useful to Know
- Rice to water ratio – Use 1 cup of rice to 1.5 cups of water for stove cooking. For oven or microwave rice, increase to 2 cups of water per 1 cup of rice.
How long does rice last in the fridge? Store rice in an airtight container for up to 4 days. Some say 6 days is okay, but it’s safer to stick to 4 days. - Freezing rice – Rice freezes really well! It can last 3–4 months in the freezer.
- How to reheat rice – Put the rice in a bowl, drizzle 2 teaspoons of water per 1 cup of cold rice, cover with cling wrap, and microwave on high for 1 minute. The water creates steam, making the rice moist and fresh again.
- Can you eat cold rice? Yes, but it can be hard and dry. Cold rice works perfectly for Fried Rice or Chinese Rice Soup. Just add it near the end when the recipe calls for cooked rice.
How much rice does 1 cup uncooked rice make?
1 cup of uncooked rice makes about 3 cups of cooked rice. This is enough for 3 normal servings or 4 smaller servings. - No need for measuring cups – You don’t have to use official measuring cups. You can use anything to measure rice and water as long as you keep the same ratio. For example, 1 level mug of rice with 1½ mugs of water, or a bowl, can, or jug – anything works!
- Calories in rice – 1 cup of cooked white rice has 206 calories.
What to Serve with Rice
Now the fun part – what to eat with your rice! Here are some ideas:
- Stir fries – Stir fries were made to go with rice and soak up all the tasty sauces.
- Curries – Rice and curry sauces are a perfect match!
- Fried rice – Make Chinese Fried Rice, Nasi Goreng (Indonesian Fried Rice), Thai Fried Rice, or Kimchi Fried Rice.
- Chilli Con Carne – Try it with your favourite Chilli Con Carne, like a shredded beef version.
- Other saucy dishes – Serve rice with Beef Stroganoff, Honey Mustard Chicken, or any dish with sauce.
- Rice salad – Make a refreshing rice salad.
- Bibimbap – Try a Korean Rice Bowl for something different.
Honestly, rice goes well with anything saucy – Asian or not. Its neutral flavor makes it perfect for pairing with almost any dish!
Congratulations – You’re Now a Rice Master!
If you’ve read this far, you now know the basics of cooking rice perfectly! You can make rice anytime, anywhere, without needing any special equipment.
How to Cook White Rice
Stovetop cooking gives the best results for perfectly fluffy, evenly cooked rice. This is my go-to, favourite method. Oven cooking is great for large batches because it cooks more evenly than the stove (we use the oven at RecipeTin Meals). The microwave method is useful too because it’s the fastest option!
Do NOT rinse your rice – rinsing is not needed for fluffy rice (read the post for more details). The only exception is if you’re worried about cleanliness, for example, if you bought rice from sacks at a market. If you do rinse your rice, reduce the water by 2 tablespoons for every 1 cup of rice to avoid overly soft or mushy rice.
Prep: 1 minutes
Cook: 13 minutes
Resting: 10 minutes
Total: 24 minutes
Ingredients
Stovetop (my default method)
- 1 cup uncooked white rice – short, medium, or long grain
- 1½ cups water
Oven
- 2 cups white rice – short, medium, or long grain
- 3 cups boiling water
Microwave
- 1 cup uncooked white rice – short, medium, or long grain
- 2 cups boiling water
Instructions
- Before you start:
- Check rice type: This recipe works for white rice: long grain, medium grain, or short grain (except sushi rice). For basmati, jasmine, or brown rice, see their separate recipes.
- DO NOT RINSE your rice – see the introduction above for why rinsing isn’t needed.
- Stovetop (my default):
Bring to simmer – Put the rice and water in a large saucepan over medium-high heat. Once the water is gently bubbling across the surface (it may get a little foamy, see video), turn the heat to low and cover with a lid.
Cook 13 minutes – Let it cook for 13 minutes. Do not stir and do not lift the lid. Check by tilting the pan; all the water should be absorbed.
Rest – Take the saucepan off the stove, keeping the lid on, and let it rest for 10 minutes.
Fluff – Remove the lid, fluff the rice with a rice paddle or fork, and serve!
- Oven:
Preheat oven – Set the oven to 200°C / 390°F (180°C fan).
Pot – Use a small casserole or pot about 24 cm / 10″ wide with a lid
Bake 35 minutes – Put the rice and boiling water in the pot, cover with the lid, and bake for 35 minutes.
Rest & fluff – Take the pot out of the oven and leave it for 10 minutes with the lid on. Then remove the lid, fluff the rice with a rice paddle or fork, and serve. (Yields about 6 cups)
- Microwave:
Prepare – Put the rice and boiling water in a tall microwave-safe container.
Microwave 12 minutes – Cook on high without a lid (for 1100–1200 W microwaves).
Rest & fluff – Take the container out, cover with a lid, and let it sit for 10 minutes. Then remove the lid, fluff the rice with a rice paddle or fork, and serve!
Recipe Notes:
- Rice types – use this rice recipe for:
- ong grain white rice
- medium grain white rice
- short grain white rice except sushi rice
- basmati rice
- DO NOT use this recipe for:
- jasmine rice (uses less water)
- brown rice (boil and drain is best method)
- sushi rice
- wild rice , black rice, or other special rices
- risotto rice
- paella rice
- quinoa
More rice for oven – Oven rice can get crispy on the edges if you cook a small amount. The minimum I recommend is 2 cups of rice.
Boiling water for oven and microwave – Using boiling water helps rice cook evenly. In the oven, it takes time for water to heat up, and in the microwave, heating usually starts from the outside, which can make rice cook unevenly.
Oven baking vessel – A medium-size 24 cm / 10″ ceramic or cast iron pot with a lid works best. You can also use a 20 cm / 8″ pan with foil. If you are cooking more rice, use a larger pan.
Microwave container – Use a tall microwave-safe container, preferably round, about 3–4 times taller than the water level. This helps the rice cook evenly and prevents overflow. You may need to add more cooking time if your microwave is weaker.
Quantity of cooked rice – 1 cup uncooked rice makes about 3 cups (packed) of cooked rice.
- Storing – Keep rice in the fridge for up to 4 days in an airtight container, or freeze for up to 3 months. Refrigerated rice can get dry, which is perfect for making fried rice. – Keep rice in the fridge for up to 4 days in an airtight container, or freeze for up to 3 months. Refrigerated rice can get dry, which is perfect for making fried rice.
- Reheating – To serve (for stir-fries or curries), sprinkle 2 tsp water per 1 cup cooked rice, cover with a lid or cling wrap, and microwave. The water will make the rice moist again.– To serve (for stir-fries or curries), sprinkle 2 tsp water per 1 cup cooked rice, cover with a lid or cling wrap, and microwave. The water will make the rice moist again.
Cooking rice at high altitude – Add 1 extra minute of stove cook time for every 300 m / 1,000 ft above sea level because water boils at a lower temperature. Depending on your pot, you may need to add 1–2 tbsp extra water to replace liquid lost as steam. Adjust in later batches if needed.
Nutrition – 1 cup cooked rice.
Nutrition Information:
Calories:205cal (10%)Carbohydrates:45g (15%)Protein:4g (8%)Fat:1g (2%)Saturated Fat:1g (6%)Sodium:2mgPotassium:55mg (2%)Fiber:1g (4%)Sugar:1g (1%)Calcium:16mg (2%)Iron:1mg (6%)