
Cutting butternut squash can look scary the first time. Its skin is tough, and its shape makes it roll around on the cutting board. But don’t worry — once you learn the right steps, it becomes quick and easy. This step-by-step guide will show you how to cut butternut squash safely so you can enjoy it in soups, salads, and roasted dishes.
I used to skip buying whole butternut squash because I thought it was too hard to cut. After learning a few simple tricks — like cutting off the ends first and keeping it steady on the board — I realized it’s not hard at all. Now, I can prep one in just a few minutes.
No matter if you want cubes for roasting, slices for salads, or halves for stuffing, this easy cutting guide will help you do it with confidence and no stress.
Why Butternut Squash is Worth the Effort
Butternut squash is one of the best fall vegetables to cook with. It has a sweet, nutty taste that works in many recipes. You can roast it, mash it, turn it into soup, or even stuff it for a nice side dish. Its bright orange color means it has beta-carotene, which is good for your eyes and skin.
This vegetable is also full of fiber, vitamin C, magnesium, and potassium. These help keep you healthy, support your immune system, and keep you feeling full. One cup of cooked butternut squash is low in calories but packed with nutrition, which makes it a great choice for healthy meals.
When I started cooking more, I noticed how much butternut squash improved my dishes. Its natural sweetness made roasted vegetables taste better, and it goes perfectly with spices like cinnamon or paprika. Once you learn to cut it, you’ll want to use it all season.
Tools You’ll Need Before You Start
Cutting butternut squash is much easier when you have the right tools. Here’s what you should have ready before you start:
The Best Knife for Butternut Squash
- Use a sharp chef’s knife – strong and heavy enough to cut through tough skin.
- Avoid dull knives – they need more force and can slip, which is dangerous.
- Sharpen your knife first – I always do this, and it makes cutting smoother.
- Serrated knife option – works if you need to saw through very hard skin, but chef’s knife gives cleaner cuts.
Other Helpful Tools (Peeler, Cutting Board, Spoon)
- Cutting board: Choose a sturdy one that won’t slide. Put a damp towel under it for safety.
- Vegetable peeler: A Y-shaped peeler is great for removing skin in long strips.
- Strong spoon: Use it to scoop out seeds from the round part after cutting in half.
- Optional tools: A bench scraper for gathering cubes and a microwave-safe plate if softening the squash first.
How to Soften Butternut Squash Before Cutting
Butternut squash can be very hard to cut when it’s raw. Softening it first makes it safer and easier to handle. Here are three easy ways to make your squash easier to cut:
Microwave Method (Quickest Way)
- Pierce the squash several times with a fork or knife to let steam escape.
- Place it on a microwave-safe plate.
- Microwave for 2 to 3 minutes on high.
- Let it cool for a minute, then cut as usual — the skin and flesh will be softer.
- I often use this method when I’m in a hurry because it saves time and effort.
Oven Method (Best for Large Squash)
- Preheat your oven to 375°F (190°C).
- Place the whole squash on a baking sheet.
- Bake for 10–15 minutes until slightly softened.
- Remove carefully, let it cool a bit, then cut and peel.
- This method works well when you already have the oven on for roasting.
Hot Water Soak Method (No Microwave Option)
- Fill a large pot or sink with very hot water.
- Soak the whole squash for 10–15 minutes.
- Dry it off, then cut — the skin will be easier to work through.
- I like this option when I’m not using a microwave, especially for meal prep days.
How to Cut Butternut Squash (Step-by-Step)
Step 1 – Wash and Dry the Squash
- Rinse the butternut squash under cool running water to remove dirt and bacteria.
- Use a vegetable brush if the skin looks dusty or has soil on it.
- Pat it completely dry with a clean kitchen towel so it won’t slip while cutting.
- I always take a moment to dry it well—this step makes cutting much safer.
Step 2 – Trim the Ends
- Place the squash on a large, steady cutting board.
- Using a sharp chef’s knife, cut off the stem and bottom ends.
- Trimming the ends helps the squash stand flat, making it more stable and safer to work with.
Step 3 – Peel the Skin (Optional)
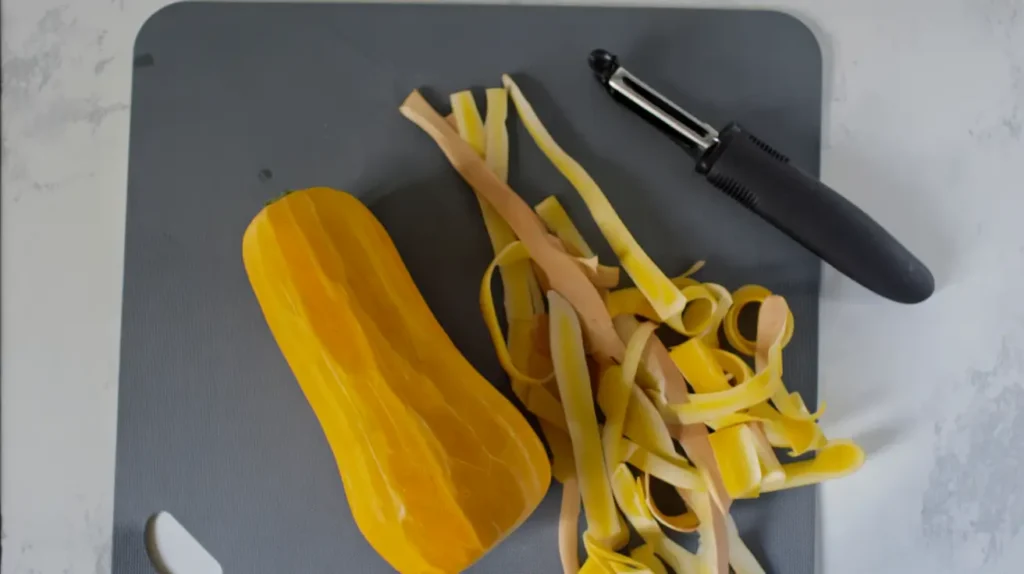
- If your recipe calls for peeled squash, use a sturdy vegetable peeler to remove the skin.
- Peel downward in long, smooth strokes for even results.
- I prefer a Y-peeler—it glides easier and saves time.
- For roasted halves, you can skip peeling and scoop the flesh after cooking.
Step 4 – Cut the Squash in Half
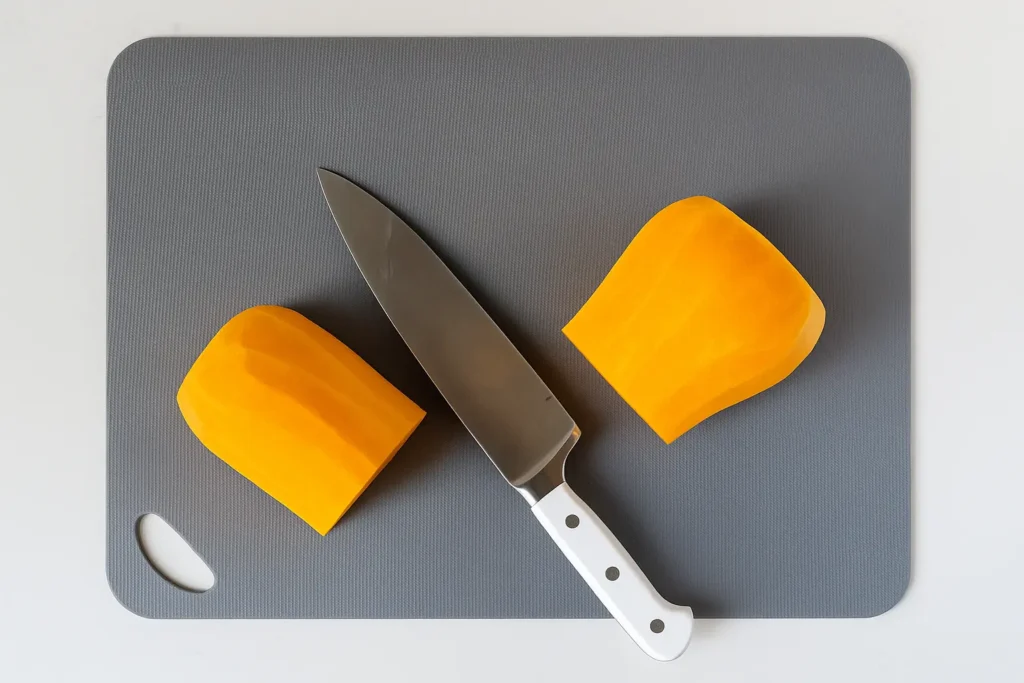
- Stand the squash upright on its trimmed end.
- Slice down the middle from top to bottom with steady, even pressure.
- Take your time—I like to place one hand on top of the knife for better control when cutting through the thick part.
Step 5 – Scoop Out the Seeds
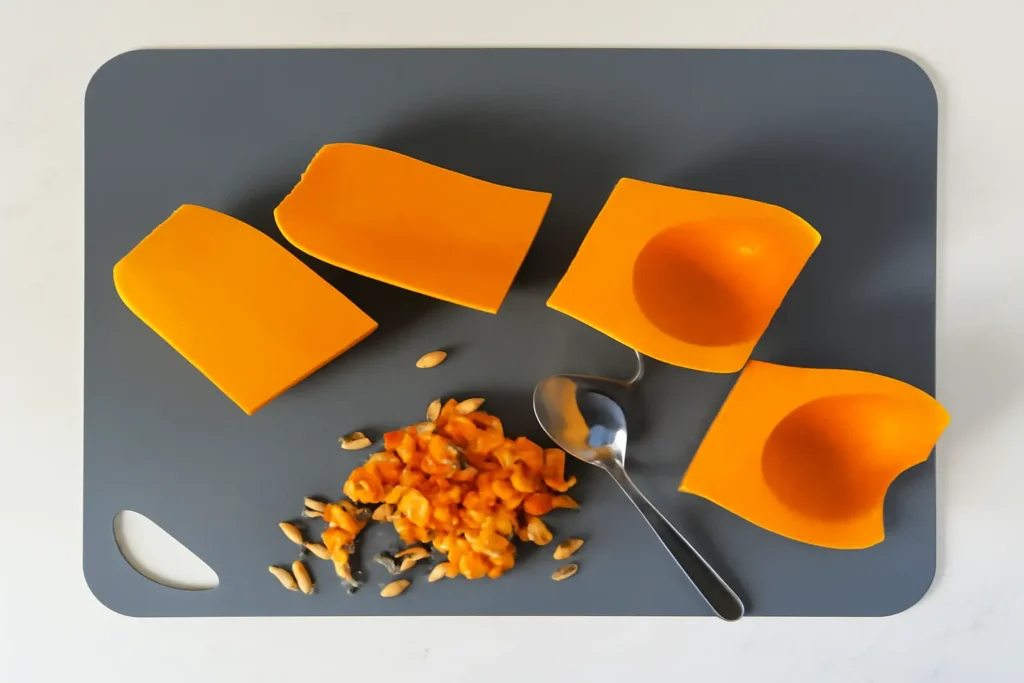
- Use a sturdy spoon to scrape out the seeds and stringy pulp.
- Save the seeds if you like—they roast up just like pumpkin seeds and make a crunchy snack.
- Make sure the inside is clean before moving to the next step.
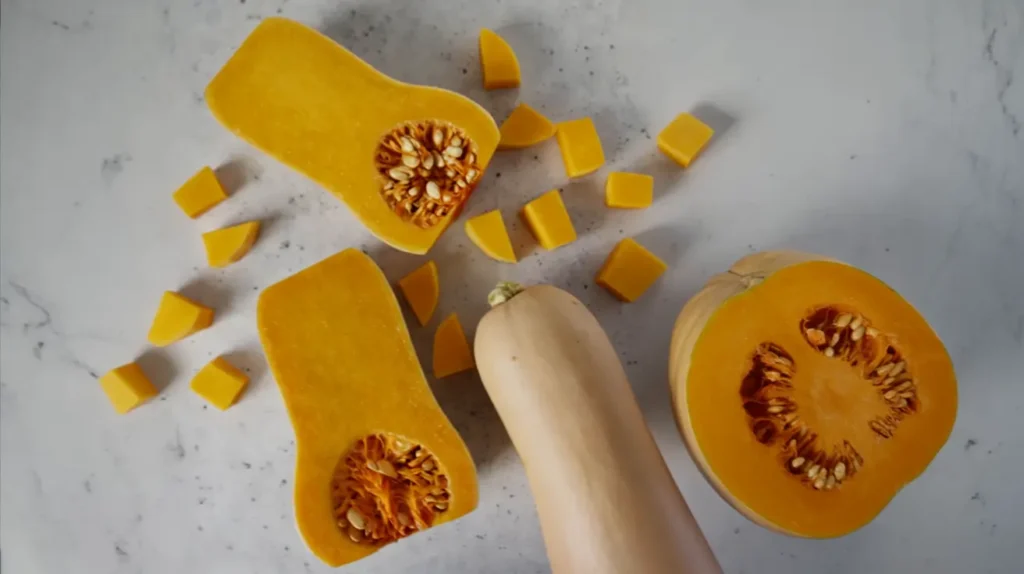
Step 6 – Slice and Dice to Desired Size
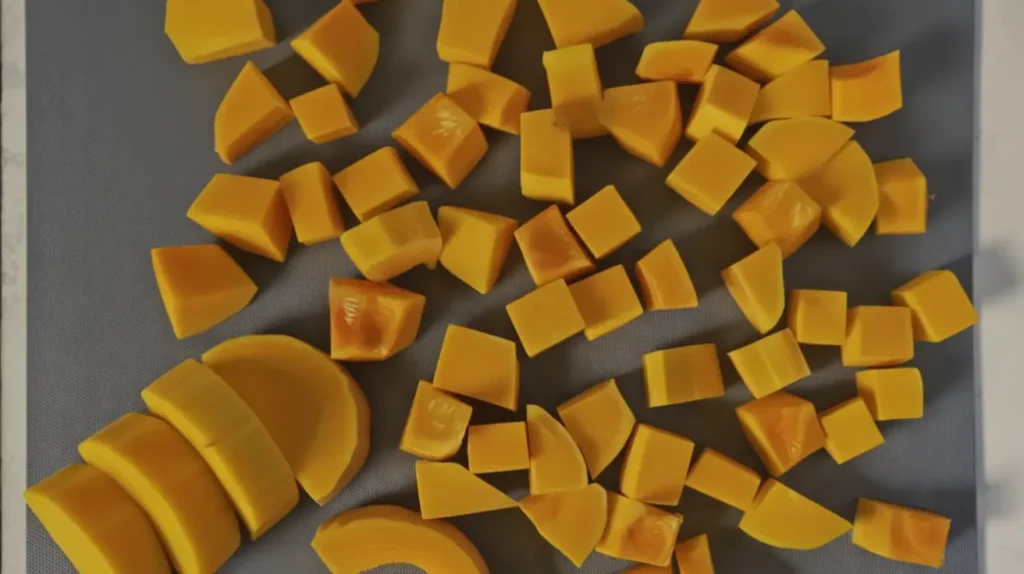
- Lay each half flat on the board for stability.
- Slice into half-moons, then cut into chunks or cubes depending on your recipe.
- For soups, I prefer smaller cubes—they cook faster and blend smoothly.
- For roasting, keep pieces a bit larger so they hold their shape.
Different Ways to Cut Butternut Squash
For Cubes (Soups, Curries, Roasting)
- Start by peeling and halving the squash.
- Slice each half into long planks, then cut into strips, and finally into cubes.
- Keep cubes uniform so they cook evenly—this makes soups and curries silky and smooth.
- Personally, I love using cubes for sheet-pan dinners because they roast evenly and caramelize around the edges.
For Slices (Roasting, Salads)
- Skip peeling if you like the skin to stay on for extra texture.
- After halving and scooping the seeds, place the squash cut-side down and slice into half-moons or thin wedges.
- These slices roast beautifully and work great in salads or as a simple side dish.
- I often roast slices with olive oil and herbs—they look rustic and are perfect for fall meals.
For Halves (Stuffed Squash Recipes)
- After washing, trimming, and halving, leave the peel on to hold the shape while cooking.
- Scoop out the seeds to create space for stuffing.
- Rub with olive oil and season before baking—this keeps the flesh tender and flavorful.
- One of my favorite comfort meals is stuffed butternut squash with quinoa, veggies, and cheese—it’s both hearty and beautiful to serve.
Safety Tips When Cutting Butternut Squash
Cutting butternut squash can be tricky because it’s hard and slippery, but a few simple safety tips make it much easier.
- Use a sharp chef’s knife: A dull knife is actually more dangerous because it can slip. I always sharpen mine before cutting squash, and it makes a huge difference.
- Work on a stable cutting board: Place a damp kitchen towel under your board to keep it from sliding. This trick has saved me more than once when working with hard vegetables.
- Keep your fingers safe: Curl your fingers under and hold the squash with your knuckles forward (known as the “claw grip”). This gives you more control and keeps your fingertips out of danger.
- Cut in sections, not all at once: If the squash feels too hard, cut it into smaller, more manageable pieces first.
- Go slow: Rushing is when most kitchen accidents happen, so take your time and let the knife do the work.
When I first started cooking, I struggled with cutting squash and even nicked my finger once. Ever since, I follow these steps every time—it keeps me safe and makes prep less stressful.
Creative Uses for Butternut Squash Seeds
Don’t throw away butternut squash seeds! They make a crunchy, healthy snack that’s easy to prepare. Rinse the seeds, dry them with a towel, and toss with a little olive oil and salt. Spread them on a baking sheet and bake at 325°F (160°C) for 15–20 minutes until golden and crispy.
You can try fun flavors too. Add smoked paprika and garlic powder for a salty snack, or cinnamon and sugar for a sweet treat. These seeds are also great sprinkled on salads, soups, or roasted veggies for extra crunch.
The first time I roasted squash seeds, I was shocked by how tasty they were—better than store-bought pumpkin seeds! It’s a smart way to use the whole squash and cut down on kitchen waste.
Storage Tips After Cutting
- Fridge Storage:
- Place cut squash (cubes or slices) in an airtight container or zip-top bag.
- Add a paper towel inside to absorb extra moisture.
- Keeps fresh for 4–5 days.
- Great for meal prep—ready for soups, curries, or roasting anytime.
- Place cut squash (cubes or slices) in an airtight container or zip-top bag.
- Freezer Storage:
- Spread cubes on a baking sheet and freeze until solid.
- Move them to a freezer-safe bag so they don’t stick together.
- Lasts up to 3 months in the freezer.
- Perfect for quick weeknight meals—just grab what you need.
- Spread cubes on a baking sheet and freeze until solid.
- Pro Tip:
- I like to prep extra squash on weekends and freeze it.
- It saves time and makes healthy dinners easier during busy weeks.
- I like to prep extra squash on weekends and freeze it.
Common Mistakes to Avoid
Cutting butternut squash doesn’t have to be stressful, but there are a few mistakes that can make it harder (and even dangerous).
- Using a dull knife: This is one of the biggest mistakes. A dull knife can slip and cause injury. I always sharpen my chef’s knife before cutting squash, and it makes the job much safer and easier.
- Skipping the peel when needed: The skin is edible, but leaving it on when you want soft cubes for soups can make them chewy. Peel it if your recipe calls for tender, smooth pieces.
- Cutting on a wobbly board: A moving cutting board is risky. Place a damp towel underneath to keep it steady.
- Trying to cut through the squash in one go: Break it down into smaller pieces first. Cutting through the middle of a rock-hard squash in one motion can be dangerous.
When I first started cooking, I tried cutting a whole squash without trimming the ends—and it nearly rolled off the counter. Now I always secure it and work in sections, which feels much safer and faster.
FAQs (Frequently Asked Questions)
Do I need to peel butternut squash?
Not always! The skin is edible, especially if you’re roasting slices or halves. But if you want soft cubes for soups or mashes, peeling is best. I like to use a Y-shaped vegetable peeler—it’s quick and gets thin, even strips without wasting too much flesh.
What’s the easiest way to cut a big squash?
The trick is to break it down into smaller sections. Trim the ends first, then cut the squash in half between the neck and bulb. Working with smaller pieces makes it easier to handle and safer to cut. I also microwave it for a minute or two if it’s very hard—this softens it just enough to slice without extra force.
How do I keep it from rolling?
Place the squash on a stable cutting board and trim a thin slice off one side to create a flat surface. This stops it from rolling and keeps your knife steady. I learned this trick after chasing a squash across my counter one too many times—it makes a big difference in safety.
Conclusion
Cutting butternut squash may feel tricky at first, but once you know the steps, it becomes simple and quick. With the right knife, a stable board, and a little practice, you’ll have perfect cubes, slices, or halves ready for any recipe.I’ve found that prepping squash ahead of time makes weeknight meals so much easier. Whether I’m roasting it for a cozy fall dinner or adding cubes to soup, having it ready to go saves time and stress.
So grab a squash, follow these steps, and give it a try—you might be surprised how easy it feels the second time around. The reward is sweet, nutty flavor that works in everything from soups to salads.